It’s Nikon’s slickest 1 camera yet, with a tilting touchscreen and Wi-Fi. Let's finds out how well it measures up.
Nikon 1 V3 Review - The last incarnation of the V range, the V2, was SLR-like in its styling. It had a good range of dials and buttons, as well as an integrated viewfinder and a deep handgrip. Nikon has taken a slightly different approach for the V3, removing the built-in viewfinder and making it an optional extra (called the NF-N1000.
Nikon 1 V3
The V3 has a one-inch type sensor and has increased on the V2’s 14.2 million pixels to reach 18.4 million pixels. The sensor’s optical low-pass filter has been removed, which should mean an increase in detail. Read More About Nikon 1 v3 Another Reviews is Here
BUILD AND HANDLING
In comparison with the V2, the V3 has a much flatter appearance. The textured, raised portion of the grip that is there still makes it comfortable to hold, though.
There are a lot of dials and switches on the V3, which make it pretty easy and intuitive to use. There’s also a fair amount of customization including a dial on the rear of the camera that can be changed to a number of different settings. On the front is a small dial that controls different functions depending on the shooting mode you’re using. In Aperture Priority mode, for instance, it controls aperture. Other buttons are grouped in two positions – one down the left-hand side of the rear, including menu and playback buttons, and the other grouped on the right-hand side, where you’ll find all the buttons you need for most shooting operations. You have a couple of options for setting the auto-focus point. If you prefer physical buttons, you can hit the OK button in the center of the navigational pad, then use the directional keys to move to the point you want. You can also simply tap the area on the screen that you want to focus on.
“The amount of detail on display is good, especially for a camera with a mere one-inch sensor”
PERFORMANCE
Colors straight from the camera are bright and punchy, without displaying too much saturation or vibrance. The amount of detail on display is also good, especially for a camera with a mere one-inch sensor. However, the results are still not able to compete with those from cameras fitted with larger sensors, as the V3’s images have less detail visible when they are viewed at 100%.
Generally, the camera’s metering system does a good job of producing accurate exposures, while the automatic white balance system copes well with mixed or artificial lighting to produce accurate colors This is borne out in our lab results.
Auto-focusing speeds are swift, with the hybrid AF system doing a good job in all but the dimmest of light. The kit lens is a good all-round performer, offering decent sharpness and a flexible focal length.
At mid-range sensitivities, such as ISO 800, the overall impression of noise is good, but look closely and you can see a little loss of detail and some speckling. If you up the sensitivity to ISO 3,200, the noise visibility increases significantly, although it shouldn't be a problem at small printing sizes. Comparing raw images reveals that the V3’s JPEG noise reduction is quite heavy-handed, so you might be better off applying your preferred settings in post-production.
Overall
We say: The V3 is the sleekest yet in the 1 series. It’s nice to see newer technologies, such as a touchscreen, but it’s a shame not to get the eye-level viewfinder as standard.
Nikon 1 V3 reviewNikon 1 V3 review, Andrian manhatan Reviewing Nikon 1 V3 and 1 v3 Recommended For you Amateur Photographer, the Best Image Quality for A PhotographerAndrian ManhatanNikon 1 V3
Leica’s first mainstream CSC will set you back a pretty penny, but is it worth the outlay?
Leica T Reviews - While compact system cameras have become pretty commonplace over the past couple of years, Leica through its series of rangefinders has arguably been in the CSC market for longer than anybody else. Now, however, it has introduced the T, which will compete more directly with the likes of the Fujifilm X series, the Olympus PEN and OM-D ranges and the Sony E-mount systems.
Leica says that the T system is a return to “back-to-basics shooting”, a claim that is borne out by the fact that there aren’t very many complicated controls on the body of the camera itself.
Inside the T is a 16.5 million-pixel APS-C sized sensor, which puts it in direct competition with cameras from Sony, Samsung, Canon and Fujifilm. Leica has also developed a new image processing engine for the T series. The Leica T mount is brand-new.
There are currently just two new lenses that are directly compatible: an 18-56mm f/3.5-5.6 lens and a 23mm f/2 prime optic Unlike with Leica’s M rangefinder lenses, T lenses are capable of autofocussing. You can attach classic lenses via an adaptor – although these optics remain Manual Focus only.
"The Leica T features an APS-C sized sensor"
Leica is promising to introduce two more lenses for the T system during September’s Photokina, the huge biennial photo industry fair. Look out for a wide-angle 11-23mm f/3.5-4.5 and a telephoto 55-130mm f/3.5-4.5.
Leica is positioning this camera more towards the luxury end of the market, so design is a key selling point. The body has been designed in collaboration with car manufacturer Audi and is crafted from a single block of aluminium.
Interestingly, the company hasn’t skimped on modern features. There’s integrated Wi-Fi, which allows for the quick transfer of images across to your smartphone, tablet or computer, or for those devices to be used as a remote viewfinder. There’s also a 3.7-inch touchscreen on the back of the camera – much larger than the displays on most CSCs. No viewfinder is included, but an optional model can be attached via the hotshoe.
Build and Handling
At 134x69x33mm, the T is a fair bit smaller than other Leica models. It’s reasonably similar in size and shape to the Panasonic GX7, for example. But it’s quite a heavy camera, and having been crafted from a single piece of aluminium, it feels pretty solidly built too.
Probably the most notable thing about the T’s design is the scarcity of buttons on the body compared with the plethora most modern cameras offer. Most of the rear is taken up with the LCD screen. While there is some space here where additional buttons could have been added, this would no doubt have distracted from the sleek appearance of the camera. There are two dials on the top of the camera, which control different parameters depending on the shooting mode you’re in. The left dial can be customised. For instance, if you’re in Aperture Priority mode, the right dial will control aperture, and you could set the left to adjust sensitivity or exposure compensation.
Also on the top of the camera, you’ll find an on/off switch, a dedicated video record button and the shutter release. If you move the on/off switch past the ‘on’ position, the built-in flash will pop up. Aside from these few manual controls, though, you’re completely reliant on the touchscreen for changing modes and settings. A menu accessed by pressing a camera icon in the centre right of the screen brings can be customised to match your needs. As with the dials, this menu can be customised to your preferred way of working, with a simple hold-and-swipe gesture replacing and re-ordering the functions as desired. Entering playback requires a swipe down from the top of the screen, or a swipe up from the bottom – which is quite a nice touch.
“The body has been designed with Audi and is crafted from a single block of aluminium”
PERFORMANCE
With a premium price tag and the weight of the Leica brand behind it, expectations for the T were pretty high. Sadly, these haven’t quite been met. While the image quality is good, it’s really only competitive with what is already available on the market for a much cheaper price. Most of the time, colours are rendered pretty well, but there are occasions where skies in JPEG images are overly cyan when compared with the raw (DNG) images.
“The automatic white balance system does an excellent job of reproducing accurate colours”
If you’re OK to work with raw files, this isn’t a huge problem, but it’s a little bit disappointing to see. The T’s metering system does a decent job of producing accurate exposures. It has a slight tendency to underexpose, so you’ll need some positive exposure compensation in some circumstances. The automatic white balance system does an excellent job of reproducing accurate colours, even when the camera is faced with an artificial lighting source. Autofocussing speeds – and, indeed, general operating speeds – are certainly not the fastest on the market. In good light, the T will generally lock onto the subject with ease, but it has to work harder in lower light. Shot-to-shot times are a little sluggish, with a few seconds’ gap between each shot.
While the T may open up the traditionally premium Leica brand up to a wider audience, you’re paying over the odds for the famous red dot. Image quality is good, but no better than equivalent competing cameras, and the overall T system is still quite limited until Leica has the chance to develop it.
Overall
We say: Image quality from the T is no better than its equivalent rivals from Sony, Fujifilm or Samsung. If design, aesthetics and that famous red dot are your thing, though, this might just be your bag.
Leica T ReviewWhile compact system cameras have become pretty commonplace over the past couple of years, Leica through its series of rangefinders has arguably been in the CSC market for longer than anybody else. Now, however, it has introduced the T, which will compete more directly with the likes of the Fujifilm X series, the Olympus PEN and OM-D ranges and the Sony E-mount systems.Andrian ManhatanLeica T Camera
Long Exposure Photography is popular technique used to capture movement or create surreal looking images. Here's everything you need to know to get started...
Long Exposure Photography involves the deliberate use of a slower shutter speed than you would normally use, so as you would normally use, so as to deliberately blur or smooth out certain parts of an image in order to capture movement or introduce on surreal, mystical element to a photo.
While long exposure photography has long been popular with landscape photographer, it's also commonly used by action, architectural and even urban photographers who want to capture a sense of movement, or to reveal something timeless about their subject. Indeed, the technique lends itself to all kinds of creative possibilities : from catching the light trails of exploding fireworks to capturing the flow of water in a fast moving river. You can even use the technique to make crowds of people disappear when shooting popular urban landmarks.
While it might be tempting to think that long exposures work better at night, this isn't actually the case. Indeed, with the right equipment at your disposal, long exposures can be taken in broad daylight as well as the night - often with results that are every bit as intriguing and beguiling.
Over the next couple of pages we'll look more closely at the dos and don't of long exposure photography and study the best equipment to use. We've also listed examples of subjects that lends themselves to long exposures so you can try it yourself.
Basic Camera Settings
In order to shoot long exposure images you'll need to be using a camera that offers either full Manual control or Shutter priority exposure mode, both of which will give you direct control over the camera's shutter speed. Thankfully all DSLRs and most Compact System Cameras and advanced compacts will offer at least one option, if not both.
Shutter priority mode is by far the easiest mode to gain with, as this will allow you to choose a desired shutter speed with the camera automatically calculating the correct aperture to pair it with, in order to produce the most accurate exposure.
If you're shooting in full Manual mode then you can also experiment with your camera's Bulb setting. This is usually represented by the letter "B" on the shutter speed dial and is used when you can to keep the shutter open indefinitely - or at least until you manually close it by pressing the shutter button a second time.
In addition to taking direct control over shutter speed, you'll also want to lower your camera's sensitivity to its lowest ISO setting. Not only will this gain you a few additional stops of shutter speed, which can be useful if you;re shooting in bright conditions. It'll also help to keep image noise to a minimum.
Even at lower sensitivity settings noise can often be an issue with long exposure photography. If you're taking exposures of over a minute then the sensor can sometimes heat up to produce some additional noise,
something that tends to be accentuated in warmer climates. To combat this, some cameras come quipped with a Long Exposure Noise Control option. This essentially works by taking two consecutive images of exactly the same duration, Only with the shutter remaining closed for the second exposure. The camera can then compare the two images and to its best to remove any additional noise caused by the sensor heating up, it generally works well, however do bear in mind that you camera will take twice as long to capture and process the image than it would if the setting wasn't used.
Keeping Things Sharp
When shooting a long exposure you'll generally want to add a degree of motion blur to moving objects sharp. For landscapes, seascapes and architectural photography you'll almost certainly want to keep the majority of the frame sharp. THe easiest way to do this is to mount your camera on a sturdy tripod. THis will ensure that only the moving element are blurred, while the rest of the frame remains pin sharp.
The extent to which any moving element - for example, running water or clouds are blurred will, of course, depend on how fast they are moving and how long you keep the shutter open for indeed, finding the right balance between all of these elements and setting your camera up accordingly is the key to capturing attention grabbing long exposure images. If you don't use a tripod, the entire image is likely to be one giant blur owing to handshake even the most advanced image stabilisation systems can't help you if the shutter is open for several seconds or more.
As an added precaution it's also worth investing in a remote shutter release, which can negate any small movements to the camera caused by knocking the shutter button.
Using ND filters
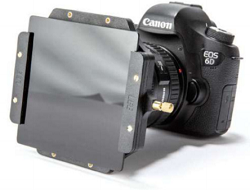
Shooting long exposures at dawn, dusk and in the dead of night is generally possible without the use of any accessories, bar a tripod and a remote shutter release. Shooting long exposure during the middle of the day, when light is in plentiful supply, is much trickier because even the smallest aperture and lowest ISO setting may not give you a long enough exposure to capture the image you cant. THis is where Neutral Density (ND) filters come in.
At their most basic level ND filters are semi transparent pieces of grey glass (or plastic) that restrict the amount of light that passes through to the sensor. The term (Neutral) refers to the way in which they are designed to have no effect on colour temperature, saturation or contrast. In reality though, most ND filters boost saturation and contrast, while cheaper filters can also affect colour. Circular ND filters have a tendency to yield better results because they are usually made from higher quality material and cover the entire end of the lends to prevent unfiltered light entering the camera. On the flip-side, they're more expensive and have to be purchased in the same filter thread as the lens you want to use.
Square ND filters, by contrast, are generally cheaper an can be stacked one in front of the other to increase their overall strength. THeir main down-fail is that they are prone to letting some unfiltered light through to the lens, which can diminish their overall effectiveness. Cheaper examples made from resin are also quite easy to scratch.
Last but not least are variable density filters. These are round in shape and attach to the end of your lens as would be regular ND filter. The big difference, however, is that they employ two polarising layers tat can be rotated to either increase or decrease the filter's overall strength, in this way a single variable density filter can be used to achieve anything from two to ten stops of extra shutter speed. Expect to pay considerably more for a variable ND filter than you would for one of fixed strength.
As regards light stopping abilities, ND filters come in a variety of strengths. THis is usually described in term of how many shutter speed of aperture stop they offer. The most common strength include 0.3 (one-stop). At the extreme end, you can buy 10-stop ND filters for use in bright sunlight, although at this strength you can't see through them with the naked eye so it'll require you to compose the shot in advance of attaching the ND Filter.
Square ND filters are often prefer for really long exposures as they can be slotted in and pulled out within a matter of seconds, unlike Circular ND filters which can be fiddly and time consuming to attach not ideal if you're looking to refine the composition for the perfect shot.
Which strength is right for you will depend on the conditions you want to use them in, but as a general rule, a 2-stop ND filter is considered a good starting point.
Panning
One useful long exposure technique that's often used by sports and action photographers is the art of panning. THis involves focusing the camera on a moving subject and panning the camera in the same direction that the subject is moving. It's not an easy technique to master, however if it is execute correctly it can produce excellent results with a relatively (though not entirely) sharp subject standing out from a horizontally blurred background that gives the image a genuine sense of motion.
The key to effective panning is keeping the subject in exactly the same portion of the frame for the duration of the shutter cycle. For this reason it helps if the subject is moving in a relatively straight trajectory. You don't need to pan the camera very much either, the front of you lens only really needs to move an inch or two while the shutter is open to crate the effect. Last but not least don't be tempted to use too slow a shutter speed, otherwise you will run the risk of camera shake creeping in, which will have the effect of blurring your main subject as well as the background. As a general rule of thumb, a shutter speed ot between 1/20sec and 1/8sec is usually ample depending on the speed of your subject.
LONG EXPOSURE EXAMPLES
Long to capture a particular type of long exposure? Then follow our guide below. Remember that it's just a guide though - the actual camera settings you'll need to use will depend on the particular lighting conditions unique to the scene you are trying to capture.
River And Streams
Taking a long exposure is a great way to smooth out a river and highlights the direction and flow of the currents within it. You'll need to mount your camera on a tripod in order to keep the rest of the scene sharp. Try to aim for an aperture of around f/8 to f/12 to keep the background in focus and pair this with a shutter speed of around 1se to 3secs. You may well need to attach a 0.3 ND filter.
Daylight Landscapes
These are best photographed on days where there is part cloud cover and a decent amount of wind to ensure the clouds move across the sky at a good speed. THis allows you to blur the clouds to produce interesting streaks in the sky. If shooting in bright conditions you'll need to use a 0.9 nD grad or higher. Again, a tripod is a must.
Sunsets
This is where ND Grad filters can come into their own, as they allow you to darken the highlights in the sky while retaining all of the available light in the landscape below. A tripod is essential and you may well want to experiment with stacking ND Grad filters and regular ND filters in order to get the best results. Use an aperture of around f/11 to help keep the image as sharp as possible.
Light Trails
Light trails effects can really enhance your urban images, adding movement and bustle to otherwise static scenes. The best time of day to shoot is at dusk when most drivers have switched their light on, but there's still enough ambient light around to illuminate the surrounding buildings. You'll need to use a tripod and set your shutter speed to around three to six seconds, depending on the speed and density of the passing traffic. You may need to attach a 0.3 ND filter to your lens too depending on how much ambient light is available.
Seascapes
Using a polarizer in tandem with a ND grad can produce magical results, smoothing out any waves and turning the sea into a fine, ethereal mist. For added impact try shooting at sunset when the setting sun reflects off the sea to produce magical bands of colour in the clouds. Without putting yourself at rick,, try to get close to the sea and frame your image so that you have wet rocks in the foreground to balance the composition. Aim for an exposure of around 30 seconds to a minute using a 10 stop ND.
Fireworks
The light trails generate by exploding firework look fantastic when captured with a long captured with a long exposure. Generally speaking you only need to open the shutter for around one to two seconds to capture individual fireworks, although you can of course open the shutter for longer in order to capture multiple explosions. An aperture of around f/5.6 to f/8 will capture the strong light emitted by the exploding gunpowder, while allowing any ambient light to partially illuminate the background Be prepared to tweak your settings, but usually an ND filter won't be necessary to get great results.