Please enable JavaScript to access this page.

8/25/2014

LONG EXPOSURE PHOTOGRAPHY

No comments:

Long Exposure Photography is popular technique used to capture movement or create surreal looking images. Here's everything you need to know to get started...


Long Exposure Photography involves the deliberate use of a slower shutter speed than you would normally use, so as you would normally use, so as to deliberately blur or smooth out certain parts of an image in order to capture movement or introduce on surreal, mystical element to a photo.

While long exposure photography has long been popular with landscape photographer, it's also commonly used by action, architectural and even urban photographers who want to capture a sense of movement, or to reveal something timeless about their subject. Indeed, the technique lends itself to all kinds of creative possibilities : from catching the light trails of exploding fireworks to capturing the flow of water in a fast moving river. You can even use the technique to make crowds of people disappear when shooting popular urban landmarks.

While it might be tempting to think that long exposures work better at night, this isn't actually the case. Indeed, with the right equipment at your disposal, long exposures can be taken in broad daylight as well as the night - often with results that are every bit as intriguing and beguiling.

Over the next couple of pages we'll look more closely at the dos and don't of long exposure photography and study the best equipment to use. We've also listed examples of subjects that lends themselves to long exposures so you can try it yourself.

Basic Camera Settings

In order to shoot long exposure images you'll need to be using a camera that offers either full Manual control or Shutter priority exposure mode, both of which will give you direct control over the camera's shutter speed. Thankfully all DSLRs and most Compact System Cameras and advanced compacts will offer at least one option, if not both.

 Shutter priority mode is by far the easiest mode to gain with, as this will allow you to choose a desired shutter speed with the camera automatically calculating the correct aperture to pair it with, in order to produce the most accurate exposure.

If you're shooting in full Manual mode then you can also experiment with your camera's Bulb setting. This is usually represented by the letter "B" on the shutter speed dial and is used when you can to keep the shutter open indefinitely - or at least until you manually close it by pressing the shutter button a second time.

In addition to taking direct control over shutter speed, you'll also want to lower your camera's sensitivity to its lowest ISO setting. Not only will this gain you a few additional stops of shutter speed, which can be useful if you;re shooting in bright conditions. It'll also help to keep image noise to a minimum.

Even at lower sensitivity settings noise can often be an issue with long exposure photography. If you're taking exposures of over a minute then the sensor can sometimes heat up to produce some additional noise,
something that tends to be accentuated in warmer climates. To combat this, some cameras come quipped with a Long Exposure Noise Control option. This essentially works by taking two consecutive images of exactly the same duration, Only with the shutter remaining closed for the second exposure. The camera can then compare the two images and to its best to remove any additional noise caused by the sensor heating up, it generally works well, however do bear in mind that you camera will take twice as long to capture and process the image than it would if the setting wasn't used.

Keeping Things Sharp

When shooting a long exposure you'll generally want to add a degree of motion blur to moving objects sharp. For landscapes, seascapes and architectural photography you'll almost certainly want to keep the majority of the frame sharp. THe easiest way to do this is to mount your camera on a sturdy tripod. THis will ensure that only the moving element are blurred, while the rest of the frame remains pin sharp.

The extent to which any moving element - for example, running water or clouds are blurred will, of course, depend on how fast they are moving and how long you keep the shutter open for indeed, finding the right balance between all of these elements and setting your camera up accordingly is the key to capturing attention grabbing long exposure images. If you don't use a tripod, the entire image is likely to be one giant blur owing to handshake even the most advanced image stabilisation systems can't help you if the shutter is open for several seconds or more.

As an added precaution it's also worth investing in a remote shutter release, which can negate any small movements to the camera caused by knocking the shutter button.

Using ND filters

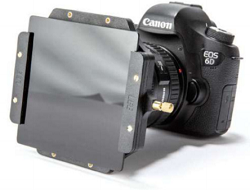
Shooting long exposures at dawn, dusk and in the dead of night is generally possible without the use of any accessories, bar a tripod and a remote shutter release. Shooting long exposure during the middle of the day, when light is in plentiful supply, is much trickier because even the smallest aperture and lowest ISO setting may not give you a long enough exposure to capture the  image you cant. THis is where Neutral Density (ND) filters come in.

At their most basic level ND filters are semi transparent pieces of grey glass (or plastic) that restrict the amount of light that passes through to the sensor. The term (Neutral) refers to the way in which they are designed to have no effect on colour temperature, saturation or contrast. In reality though, most ND filters boost saturation and contrast, while cheaper filters can also affect colour. Circular ND filters have a tendency to yield better results because they are usually made from higher quality material and cover the entire end of the lends to prevent unfiltered light entering the camera. On the flip-side, they're more expensive and have to be purchased in the same filter thread as the lens you want to use.

Square ND filters, by contrast, are generally cheaper an can be stacked one in front of the other to increase their overall strength. THeir main down-fail is that they are prone to letting some unfiltered light through to the lens, which can diminish their overall effectiveness. Cheaper examples made from resin are also quite easy to scratch.

Last but not least are variable density filters. These are round in shape and attach to the end of your lens as would be regular ND filter. The big difference, however, is that they employ two polarising layers tat can be rotated to either increase or decrease the filter's overall strength, in this way a single variable density filter can be used to achieve anything from two to ten stops of extra shutter speed. Expect to pay considerably more for a variable ND filter than you would for one of fixed strength.

As regards light stopping abilities, ND filters come in a variety of strengths. THis is usually described in term of how many shutter speed of aperture stop they offer. The most common strength include 0.3 (one-stop). At the extreme end, you can buy 10-stop ND filters for use in bright sunlight, although at this strength you can't see through them with the naked eye so it'll require you to compose the shot in advance of attaching the ND Filter.

Square ND filters are often prefer for really long exposures as they can be slotted in and pulled out within a matter of seconds, unlike Circular ND filters which can be fiddly and time consuming to attach not ideal if you're looking to refine the composition for the perfect shot.

Which strength is right for you will depend on the conditions you want to use them in, but as a general rule, a 2-stop ND filter is considered a good starting point.

Panning 

One useful long exposure technique that's often used by sports and action photographers is the art of panning. THis involves focusing the camera on a moving subject and panning the camera in the same direction that the subject is moving. It's not an easy technique to master, however if it is execute correctly it can produce excellent results with a relatively (though not entirely) sharp subject standing out from a horizontally blurred background that gives the image a genuine sense of motion.

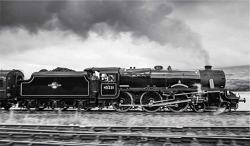
The key to effective panning is keeping the subject in exactly the same portion of the frame for the duration of the shutter cycle. For this reason it helps if the subject is moving in a relatively straight trajectory. You don't need to pan the camera very much either, the front of you lens only really needs to move an inch or two while the shutter is open to crate the effect. Last but not least don't be tempted to use too slow a shutter speed, otherwise you will run the risk of camera shake creeping in, which will have the effect of blurring your main subject as well as the background. As a general rule of thumb, a shutter speed ot between 1/20sec and 1/8sec is usually ample depending on the speed of your subject.

LONG EXPOSURE EXAMPLES

Long to capture a particular type of long exposure? Then follow our guide below. Remember that it's just a guide though - the actual camera settings you'll need to use will depend on the particular lighting conditions unique to the scene you are trying to capture.

River And Streams

Taking a long exposure is a great way to smooth out a river and highlights the direction and flow of  the currents within it. You'll need to mount your camera on a tripod in order to keep the rest of the scene sharp. Try to aim for an aperture of around f/8 to f/12 to keep the background in focus and pair this with a shutter speed of around 1se to 3secs. You may well need to attach a 0.3 ND filter.

Daylight Landscapes

These are best photographed on days where there is part cloud cover and a decent amount of wind to ensure the clouds move across the sky at a good speed. THis allows you to blur the clouds to produce interesting streaks in the sky. If shooting in bright conditions you'll need to use a 0.9 nD grad or higher. Again, a tripod is a must.

Sunsets

This is where ND Grad filters can come into their own, as they allow you to darken the highlights in  the sky while retaining all of the available light in the landscape below. A tripod is essential and you may well want to experiment with stacking ND Grad filters and regular ND filters in order to get the best results. Use an aperture of around f/11 to help keep the image as sharp as possible.

Light Trails

Light trails effects can really enhance your urban images, adding movement and bustle to otherwise static scenes. The best time of day to shoot is at dusk when most drivers have switched their light on, but there's still enough ambient light around to illuminate the surrounding buildings. You'll need to use a tripod and set your shutter speed to around three to six seconds, depending on the speed and density of the passing traffic. You may need to attach a 0.3 ND filter to your lens too depending on how much ambient light is available.

Seascapes

Using a polarizer in tandem with a ND grad can produce magical results, smoothing out any waves and turning the sea into a fine, ethereal mist. For added impact try shooting at sunset when the setting sun reflects off the sea to produce magical bands of colour in the clouds. Without putting yourself at rick,, try to get close to the sea and frame your image so that you have wet rocks in the foreground to balance the composition. Aim for an exposure of around 30 seconds to a minute using a 10 stop ND.

Fireworks

The light trails generate by exploding firework look fantastic when captured with a long captured with a long exposure. Generally speaking you only need to open the shutter  for around one to two seconds to capture individual fireworks, although you can of course open the shutter for longer in order to capture multiple explosions. An aperture of around f/5.6 to f/8 will capture the strong light emitted by the exploding gunpowder, while allowing any ambient light to partially illuminate the background Be prepared to tweak your settings, but usually an ND filter won't be necessary to get great results.


Our Camera Reviews:

8/24/2014

Panasonic Lumix DMC-GH4 Reviews

No comments:

4K lightning Above The GH4’s weatherproof seals mean you can use it in all conditions It may look like the GH3, but the GH4 is a serious upgrade with 4K video and better images.


While the Panasonic GH3 is widely regarded as a great compact system camera for shooting video, its stills capability has been rather overlooked. Panasonic is hoping that the GH4 will gain more respect as a stills camera –but its headline specification is its ability to shoot Ultra High Definition 4K (4,096x2,160-pixel) video.

Panasonic has clearly invested a lot of time and effort in improving on the GH3 for the GH4, and the new camera has an extensive list of new or enhanced features. However, some may be surprised to learn that the sensor’s pixel count has stayed the same at 16.05 million, even though the sensor is completely new. Outwardly, the Panasonic Lumix DMC-GH4 also looks almost identical to the GH3 and has a very similar arrangement of controls.

Where To Buy : US >> Best Buy <<     UK >> Best Buy <<

"The GH4’s weatherproof seals mean you can use it in all conditions"


Features

Panasonic Lumix Gh4 - is keen to point out that any improvements made to allow 4K video recording also have a beneficial impact on still image quality. For example, because 4K recording is so demanding in processor power, the new 16.05-million-pixel Digital Live MOS sensor is coupled with the Venus Engine IX processor (the Panasonic GX7 has the Venus Engine VIII; the GH3 has the VII version), which is a quad-core processor. In addition, the sensor has twice the read-out speed of the GH3, reaching 200Mbps. This should mean improved autofocussing (AF) speeds and better noise control.

Clearly the company is confident of the GH4’s noise control: sensitivity may be set in the native range of ISO 200-25,600, with ISO 100 as an expansion setting. In comparison, the GH3 has a range of ISO 200-12,800 with expansion settings of ISO 125 and ISO 12,800-25,600. Thanks to the new processor, the GH4 can shoot continuously at up to 12fps (frames per second) in Single-AF mode with a UHS-III SD Card installed. This rate drops to 7.5fps in continuous autofocus mode. Further refinements on the GH3 include an increase in the number of selectable AF points from 23 to 49, focus peaking to help manual focussing, and zebra display to indicate highlights that are close to burning out.

Build and handling There are only a few noticeable differences in the appearance of the GH4 in comparison with the GH3. They are closely matched in size and weight, and have an almost identical control layout. However, the eye-cup around the electronic viewfinder is slightly larger on the GH4 to offer a little more shade from strong sunlight. There’s also a lock button at the centre of the mode dial to prevent it from being knocked out of position. This lock is our preferred type, which clicks to lock or unlock that so the button doesn’t need to be held down when rotating the dial.

As before, the GH4 has a magnesium alloy body that is dust- and splash-proof, and it has the same solid feel as the camera it replaces. But Panasonic has bolstered the GH4’s durability by giving its shutter a life-span of 200,000 cycles, double that of the GH3.

“The GH4 produces great-looking images with pleasing contrast, natural colours and lots of detail”


Like the electronic viewfinder, the 3-inch LCD rear display offers a very clear view, thanks to its 1,036k-dot resolution. Images look great on it, as there’s a very pleasing level of contrast. It’s also very responsive to the touch, making it a convenient way of selecting AF point and other setting options.

PERFORMANCE

As a general rule, the GH4 produces great looking images with good exposure, pleasing contrast, natural colours and lots of detail. Zooming in to 100% on-screen reveals that some JPEG images don’t have quite the fine detail or micro-contrast that we see from other cameras, but they look great at sensible viewing sizes.

As is often the case, the GH4’s simultaneously captured raw files have more detail. At higher sensitivity settings they also have more noise, but this can be dealt with on an image-by-image basis to produce a good result.

Noise is controlled well throughout the sensitivity range, but detail isn’t maintained quite as well as in the Fujifilm X-T1, for example, at higher sensitivity settings.

At 100% on-screen, JPEGs look good up to around ISO 3,200. Above this figure, softening becomes more apparent. Raw files have chroma noise visible at 100% from around ISO 800, but it’s within acceptable limits, and as we’ve mentioned before, can be subjected to reduction as required.

By ISO 12,800, however, raw files need careful editing to conceal noise and preserve detail. ISO 25,600 gives respectable results but, as is often the case, is best kept for emergencies.

Panasonic claims that the GH4’s autofocus system can operate down to an incredible -4EV. Our testing indicates that with the right lens, it is quite a bit better in low light than previous G-series cameras. We were impressed by how quickly it was able to focus with the new Leica DG Notricon 42.5mm f/1.2 ASPH OIS in dim conditions, but this is a super-fast lens with a price to match.

Panasonic’s 12-35mm f/2.8 lens, which gives a focal length range equivalent to the popular 24-70mm on a full-frame camera, also delivers sharp subjects quickly, but we found the new 14-140mm f/3.5-5.6 kit lens a little more variable – especially at the telephoto end.

In good light, the AF system is generally very fast and it can keep pace with moving subjects when the AF point is in the correct location. Tracking AF mode has also improved, but it can’t be relied upon to follow a fast moving subject around the frame.

The autofocus system changes pace when movies are being recorded. A touch of the screen to change focus point sees the focus shift smoothly and comparatively slowly, creating a professional-looking result.

Panasonic’s metering and white balance systems have been found to be good performers in the past, and the GH4 doesn’t disappoint in either respect. The camera’s automatic white balance system produces convincing results in a wide range of lighting conditions. In natural light, the results you get when shooting using the Automatic setting are often indistinguishable from those taken using the Daylight setting.

Although the GH4 has the usual trio of metering modes (Multiple, Centre-weighted and Spot), we found that the general-purpose 1,728-zone multi-pattern metering delivers great results in most situations. There were relatively few occasions when we had to use the exposure compensation facility to adjust exposure.

"The 2x focal-length magnification factor is useful with nervous subjects"

As usual, the GH4 is supplied with ISL’s Silkypix software for editing images and converting raw files. In reality, few GH4 owners are likely to use Silkypix in preference to Adobe’s more refined and better-specified options: Photoshop CC, Lightroom 5 or Elements 12. Silkypix has most of the controls you need, but it isn’t especially intuitive or pleasant to use. Adobe’s recent update to its Camera Raw plug-in (version 8.5) makes GH4 raw file processing possible with the Photoshop family.

"The GH4’s aF system found this scene, taken with the 14-140mm lens, challenging"


"There’s a good, deep grip on the GH4 body"


We haven’t been able to test the GH4’s video capability extensively, but it’s clear that it produces high-quality footage. As with the camera’s still images, exposure, white balance and colour all look good, and there’s plenty of detail visible.

Verdict

As Panasonic has stuck with the same pixel count as the GH3 for the GH4, it doesn’t make really significant strides with detail resolution, but the images do look a little nicer straight from the camera, and noise is better controlled. The GH4 also takes a step forward in autofocussing: it’s fast and accurate in most situations and can focus on subjects in pretty low light. Somehow, holding the GH4 doesn’t instil the same level of excitement as picking up the Olympus E-M10 or one of Fujifilm’s X-series CSCs, but it combines all the modern technologies that we like: a high-resolution electronic viewfinder; a vari-angle screen that’s touch-sensitive; the ability to shoot raw and JPEG images when using Creative Control filter effects; and Wi-Fi connectivity that allows the camera to be controlled remotely.

Perhaps the lack of excitement is largely because the GH4 has a modern SLR-like design rather than the retro-styling of the Olympus and Fujifilm cameras. Nevertheless, the GH4 is an excellent camera that encourages creativity and is weather- and dust-proof, so it can be used in a wide range of conditions.

Overall

The GH4 has some of our most sought-after features: a high-resolution EVF, a vari-angle screen that’s touch-sensitive and Wi-Fi connectivity. It’s also weather- and dust-proof and takes great-looking images

Where to Buy US >> Best Buy <<     UK >> Best Buy <<


4K lightning Above The GH4’s weatherproof seals mean you can use it in all conditions It may look like the GH3, but the GH4 is a serious upgrade with 4K video and better images... panasonic lumix dmc-gh4 review ,panasonic lumix dmc-gh4 4k review ,panasonic lumix dmc-gh4 price ,panasonic lumix dmc-gh4 price ,add to compare panasonic lumix dmc gh4 ,panasonic lumix dmc-gh4 buy Panasonic Lumix DMC-GH4
4.5 / 5

8/23/2014

Fujifilm X-E2 Reviews 2014

No comments:

Fujifilm X-E2 Reviews

With more than 60 improvements and refinements over the Fujifilm X-E1, does the X-E2 offer the ultimate X-series experience?

Fujifilm X-E2
Fujifilm X-E2
You could be fooled into thinking the Fujifilm X-E2 is identical to its predecessor the X-E1 until you dig deeper and find that most of the refinements are made within. The X-E2 borrows a 16.3MP APS-C X-Trans CMOS II sensor from the X100S, with the X-Trans structure that reduces more and false colour, eliminating the need for an AA filter. It also incorporates more than 100.000 phase detect pixels to create an intelligent Hybrid AF system that utilises both phase detect and contrast detect AF that Fujifilm claims can be as quick as 0.08secs. Fujifilm has also upgraded to the EXR Processor II, claiming to have doubled the speed of the X-E1.

As before, the X-E2 has moderate native ISO range of 200-6400 that can be expanded to an ISO equivalent of 100-25.600. What's interesting is that you;re only given the option of shooting JPEGs in the expanded settings, limiting the sensitivity to ISO 6400 if you prefer Raw.

As kit lenses go the 18-55mm f/2.8-4 lens that's bundled with the X-E2 is excellent. complementing the high quality body. The fast f/2.8 aperture between 19-20mm (closes to f/4 at 40mm) enables shallow depth of field and the built in optical image stabilisation system combats hand shake. THe kit lens also boasts bear silent AF performance .

Back to the design, the magnesium die cast top and front covers contribute to the robust feel, and although he rubber grip at the front looks bit like an afterthought, it considerably improves handling. THe X-E2 is somewhat nose heavy with the kit lens - not really a camera you'll want to use single handedly.

Elsewhere, out goes the X-E1's 460k-dots 2.8in display and in comes a 3in 1.040k-dot screen. Above that, the OLED electronic viewfinder (EVF) retains the same 2.36-dot resolution, but with a refresh rate increased to 50fps. The X-E2 manages to record 8 frames at 7fps in Raw format before the buffer interrupts, and inherits the dependable 256 zone metering system from the X-E1.

The X-2's newly developed AF algorithm has made significant improvements on the X-E1, which struggled in low light scenes. In single AF the X-2 locks onto targets more accurately than the X-E1, and it enjoys sprightly continuous AF performance that can be used in Multi AF and Area AF odes. ALthough the lack of a touch-screen prevents intuitively tapping to select an AF point.

The X-2 delivers an exceptional noise performance, with no sign of colour or luminance noise between ISO 100 and 800. At ISO 1600 a very faint trace of noise creeps in, however it has such a fine structure it's barely noticeable when viewed at 100%. Detail is well preserved right up to ISO 12.800 and this is the limit to which you'll want to push the sensitivity to unless you're willing to accept more noise.

Verdict

The Fujifilm X-E2 is in many ways to camera we wish the X-E1 were all along, improving on the ageing LCD screen and slow low light AF. There's room for improvement AF lock on speed is still sluggish and the app isn't too intuitive, however the solid build quality and superb handling add up to a superb handling add up to a superb user experience. It's pleasure to use.

The Fujifilm X-E2 Best for?

- Comprehensive feature set and controls
- Portability with no sacrifice in image quality
- Highly desirable retro design

Pros
- Premium finish
- Design
- Excellent Image quality
- Solid build
- High screen resolution
- Quality kit lens

Cons
- No touchscreen
- Limited Wi-fi functionality
- Basic Fujifilm camera app
- AF- assist beam easily obstructed

US >> Where To Buy Fujifilm X-E2 <<


With more than 60 improvements and refinements over the Fujifilm X-E1, does the X-E2 offer the ultimate X-series experience? fujifilm x-e2 review blog,fujifilm x-e2 review,fujifilm x e2 best price,fujifilm x-e2 camera review,fujifilm x-e2 full review,reviews for fujifilm x-e2,fujifilm x-e2 review andrian manhatan,x-e2 Price Fujifilm X-E2
4.5 / 5